Basic SEO for Humans… and Architectural Photographers
Stick with me here as I take you on a “who is Pepe Sylvia” level adventure, trying to assemble and connect the dots between different things I have learned (or think I have learned) about getting the most out of your website as an architectural photographer and small business. Be forewarned that I am approaching this as someone who is inherently skeptical of SEO, but does think that it has a place in your marketing if done smartly, concisely, and correctly.

There will be times in this article when you are thinking “Lexi, why are you talking to me about excavating a sinkhole? I take pictures of hotels.” Be patient. I hope at the end it will make sense.
My other caveat here is that I am in no way an SEO guru or marketing genius – but I think that’s what will make this post helpful. It’s search engine optimization tips for normal people who already have a lot on their plate.
Maybe something that you’ll read here is “wrong,” but I do have to brag that after restructuring my husband’s family business’s website, their revenue increased over 50%. The only thing they changed in their business, was their website.
I want you to think of this less as an exhaustive deep dive into Search Engine Optimization, and more as a friend talking to you over drinks at a noisy bar, telling you what they learned while trying to get a handle on their own site. If you want to get into the nitty-gritty, there is a whole wide web of articles on things like robots.txt, canonical links, machine learning, and other things that killed my soul a little bit each time I had to research them at the beginning of my brief, pretend career as an SEOologist. Instead, we’ll talk about ways to not waste your time or money, while having your website do a little heavy lifting. It may be a little denser than I had hoped when I started writing it, but I truly believe that if you are looking to rank better with search engines, these points will be helpful.
What the heck is SEO and does it even matter for my photography website?
The world of Serch Engine Optimization is rife with acronyms and phrases that will make anyone who dislikes sitting at a desk roll their eyes back into the deepest parts of their head. Honestly, it’s boring. So for you, fellow human and photographer, think of SEO as setting up your website in a way that will maximize its findability by search engines (aka Google). In theory, the better job you do, the higher your website will appear among other listings, and the easier it will be for potential clients to find you.
Ok, but do I really need that as a photographer?
I’m not here to tell you that you need to do anything. Many architectural photographers are using their website as a digital portfolio that serves as a link they can share when they meet a client. It’s a brief introduction to their work. That’s great, and that is what I use my own website for — A non-Instagram archive to show off to a referral-based client who thinks they want to hire me. Admittedly, I am not too worried about actively marketing my site, because I work primarily off of referrals and am spinning a lot of other plates — and that’s okay with me. So, don’t creep over to my photography site looking for good SEO practices – do as I say, not as I do.
If you want to put your website to work for you though and have it serve as a marketing tool that can potentially draw in new clients, you might want to care a tiny bit about SEO. I’m not talking about hiring an agency or buying expensive software to do this, but rather, by being intentional about having a “healthy” and “searchable” website.
Think this is something you could benefit from and want to implement? We’ll get to my thoughts, but first some warnings.
Beware the Scams and Money Pits
Unsavory SEO Companies
In her amazing end-of-year advice post, intellectual property attorney Leslie Burns said “People who sell SEO services are the used-car salesmen of the 21st century,” and suggested not chasing after the SEO train. Ironically I tend to agree. There are an immeasurable amount of people out there who claim they can get your work onto the first page of Google listings. Want proof? Look in your email’s spam box.
Every day, whether it be my personal email, my APALMANAC email, or my family business email, I get countless messages promoting website marketing businesses or from other “businesses” who want to exchange guest posts and articles in an attempt to get a backlink for their site (In this article, I will unapologetically post backlinks to my husband’s company website, but more on that later).
German architectural photographer and fellow APA writer Albrecht Voß says, “I hired a company for SEO once. I knew the owner and really trusted them. They analyzed my website and wrote me a briefing on how to optimize my site. It took half a year to finish with a big time investment into my site to name competitors, my business goals, and so on. It also cost me a couple of thousand euros without one thing actually getting optimized on the site. In the end, I was really disappointed.”
Incestuous Backlinks and Link Farming
We’ll talk about this a bit more later in the article, but backlinks are a bit like votes for your site and affect your rankings. Not all links are created equally though, and your site appearing in endless low-quality directories that are essentially spam can often be considered “link farming.”
Some of the less savory SEO businesses promising first-page Google results may use practices like these, or incestuous backlinking to initially boost rankings. I have seen, on different occasions in different industries, series of web “directories” that interlink to one another. They post the occasional fluff article about local news, and then link to the websites of the businesses that hire them. Essentially, these sites have created their own blog network, and as their SEO customer, you are just paying them to have your name thrown into that network. It may seem like a smart hack with initial results, but like most fast fixes, isn’t a great, sustainable practice. Backlinks should be of quality, not just quantity.
Pay to play
In the world of SEO, everyone has their hand out including Google. Ah Google, king of search engines. They are a business. That business wants you to pay for results. What is a surefire way to show up at the top? Pay for Google Adwords. Want to show up competitively on Google Business/Google Maps section? Become “Google Guaranteed” and then pay for advertising.
Moz & AHREFS & IONOS, Oh My!
Speaking of paying, there are loads of different SEO software out there that tout lots of features and they want you to pay monthly to track your rankings and backlinks and competitors’ listings. They are honestly very expensive (we aren’t talking $10/month here, but rather, like $99/month for basic features). Holy smokes! So do you really need it? I don’t particularly think so. Not unless you are really gung ho about SEO. When we kicked off Sam’s company’s website, we used AHREFS to do keyword research and get ourselves situated. It was also helpful to use their site audit feature when I decided to re-design their website this past fall and clean up some of my initial mistakes from website version 1.0.
If you do go this route it might be a good idea to go for that monthly plan so you aren’t locked into a very expensive thing that you use a handful of times. SEO tool Moz has a few great free features you can use to check your competitors’ backlinks, and see more information about your site. Don’t be afraid to take advantage of the free trials these companies offer.
SEO For Humans
The big takeaway I want everyone to remember about SEO is that you should write your posts and label your photos for humans, not for Google. Don’t write something because it sounds good for SEO and is stuffed with clunky buzzwords that you want your website to show up for when people type them into Google. Google invests unfathomable amounts of money into their AI and site crawlers to find good, authoritative articles that people spend time reading. Any hacks (here’s looking at you, incestuous backlink marketers) or “magic bullets” are not long for this world. If it feels slimy, that’s because it is. Don’t get your site blacklisted or marked as spam because you are trying to wiggle your way to the top.
Your website should be a lean, clean, efficient machine. Is it well organized? Is it fast? Are your photographs named correctly? This is what should matter to you as an architectural photographer. Your website should be easy to use and a pleasure to view. This is more important than any longtail keyword or metatag.
Different industries, different approaches
My husband Sam is a master plumber. His granddad opened a construction company in Baltimore in 1940 called C.A. Taciak & Sons. When my father-in-law took over the company, they had carved quite the niche for themselves repairing and replacing residential underground utilities. When Sam and I were trying to figure out the best approach to take while building the website, we had a hard time adding in photos and imagery because the nature of the work just isn’t pretty. It’s sewer line repair, and septic tank installation, and stormwater pipes. 95% of it has to do with poop! So while other plumbing websites had stock imagery of marble bathrooms and a smiling man fixing a water heater, this was a bit of a different beast.
Our tactic was to create some thoughtful technical drawings (which we copyrighted immediately thanks to the knowledge I gained from APALMANAC) and make his services pages really break down the process of how these plumbing apparatus work, why they’re essential to your home, and why their company is the most qualified to fix them. The website is very text heavy. That text is informative and authoritative and we’ve received an unexpected amount of compliments from clients, architects, municipal utility planners, and other businesses about the educational depth of our site.
We spent a great deal of time researching what homeowners might Google if they were experiencing certain types of plumbing issues in their homes. What would they type into a search bar if they were having a plumbing emergency (hello sewage explosion)? We researched what terms people may call different utilities – Is it a water service or is it a water line. What does the average homeowner call a rain leader? Is it the same as a downspout? Maybe in their mind.
As an architectural photographer, you sort of have the opposite problem. You have heaps of gorgeous photos to show. Understandably, your website will not be text heavy, but rather, filled with photographs. What can you do to make sure the meat of your website (in this case, your photos) is pulling its weight for SEO? How can you implement text into your photography website that is beneficial, and doesn’t feel out of place, or like a huge chore to regularly update?
SEO For Architectural Photographers – Usability and Best Practices
Ok, time for the part you actually care about!
Does your website offer a good user experience?
Photo-based websites should be photo-based
This is truthfully a pet peeve of mine. I see so many photographers’ websites when perusing the net for Project of the Week posts where it takes work to view their photographs. You arrive at their homepage on a blank background and are met by wall of links with project names that take you to a slideshow of photos. If you’re trying to wow clients with your photography work, lead with photos.
Take Advantage of an “About” Page
Your About page is both an opportunity for you to share information about you and your business with prospective clients, as well as a great spot to do a little SEO work. Talk about what you photograph and where you photograph it.
I know, I know — it’s tempting to say that you work worldwide so that you can emphasize that — yes you will take that gig in a foreign country by the beach, shooting an insane structure that you wouldn’t normally have access to at your home base. But consider mentioning where you are based in your biography. It offers a bit of transparency for your clients, and helps a search engine determine where to place you when someone has a query.
For example, saying you are a “Topeka Kansas-based architectural photographer” or “luxury hotel and resort photographer working in Lisbon and the surrounding area” or a “photographer specializing in residential interiors, based in Osaka but accepting commissions worldwide” in your bio does way more for your searchability than saying “I am ____ and I photograph the built environment.” When a potential client has a project they need photographed in Topeka, or Lisbon, or Osaka, or whever you are, there is a chance that they’ll Google the phrase that you used – et voilà – up pops your website as a contender.
In addition to his other stellar SEO practices, Jordan Powers’s about page on his website is a beautiful example of this concept. He says, “Almost every single [prospective client who contacted me] were not local architects, but were PR firms, marketing groups, product manufacturers, etc… all people outside of my city who had clients or projects in the area that they needed photographed.”
You can also parlay this into what you want to shoot. If you absolutely hate spending your days on location at massive corporate offices, omit that. If you love photographing restaurants, and that’s what you want your niche to be, say it!
You show up for what you say… er… type.
Properly named, tagged, and sized photographs
Image size & format
Using the right image sizes and file formats is so important for your website. Especially because as a photographer, your site is going to be very photo-centric. It’s also important because of how many people view the web on their phones these days. Page load time has an immensely important effect on your search engine ranking, as well as the usability of your website as a whole. A slow loading page results in a frustrating user experience, or a lack of interest from potential viewers. How many times have you exited a site because it was taking forever to load?
Google has a very handy tool called Page Speed Insights and it is free to use. You can plop any URL from your website into the bar and see how quickly it loads on both mobile and desktop. It shows you any errors, optimization suggestions, and your general site health.
Optimal image formats
We’re all familiar with the trusty ole JPG file. I would imagine that the bulk of the images on your site are jpegs, barring decorative PNGs. That’s awesome since jpegs are the faithful industry standard that we grew up on. But, there are new file formats on the block that are even better, faster, smaller (said to the tune of that Daft Punk song).
- WebP – WebP files are Google’s proprietary image file format that they’ve concocted to load super quickly on the web. These files are smaller than jepgs, and are of comparable quality! It’s said that they can be 25-35% smaller than a jpeg file. Adobe has put together a great summation of webp files, their use, and how to use Photoshop to export them here. I would speculate that since .webp files are a Google-owned creation, the search engine behemoth would prefer that you use them.
- AVIF (AV1) – AVIF files were originally created to share videos on the internet, but you can also use them in place of a jpeg or gif. They’re touted as the next big thing because they compress better than a WebP file (like 50% smaller than a traditional jpeg), are lossless, support a wider color gamut, and can be used transparently like a png. I have noticed that other photo-heavy sites like Dwell are using AVIF files for the images on their site. Their SEO budget is probably much bigger than yours, so it might be smart to take a hint and follow suit.
The downside to these fancy new file formats is that they aren’t supported by all browsers yet. WebP seems to be more widely supported though. Still, jpeg files are supported everywhere, and if you aren’t feeling ready to make the switch to a newfangled file format, at least make sure that your jpegs are the right size.
Optimal image sizes
So what size should your photos be for your architectural photography website? After all, you have a lot of imagery to show off. How do we keep your pages efficient and fast loading?
Optimal image sizes are like the old “how long is a piece of string” question. It changes and is really dependent on screen and browser sizes. As of this moment, the general consensus is that the most common screen resolution is 1920 x 1080 px. That being said, here’s a cheat sheet chart courtesy of Tiny Img for different image sizes:
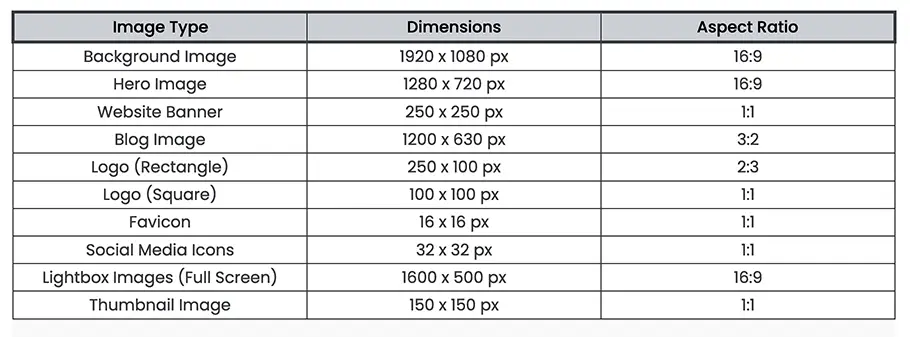
Your images should be sized for the dimensions your website. For example, if you are posting to your blog and the maximum width of the content area is set to be 800px wide, your photo only needs to be, at maximum 800px wide. This will take some digging into your site code if you didn’t make it yourself, or don’t remember the parameters you set.
Another general consensus out there is that your file sizes should be under 2 MB for site speed sake. Just because 2 MB is the maximum does not mean it’s the optimal size, and I personally think that it’s too big. I try to stay under 500 KB – ideally around 250 KB, but that is just my personal approach!
Even though your photographs are gorgeous and your attention to detail is immaculate, you don’t need those photographs to be displayed massively on your website. I can almost guarantee your clients will get the gist of how talented and special you are without having a full-screen HD mega photograph in front of them. Think of it like when you go to the movies. Nobody likes to sit in the very front row because it is torture to have to move your entire head back and forth to see what’s on the screen. In the same vein, nobody wants to have to scroll down halfway through your photo to see the rest of it.
Exporting your photos for web use
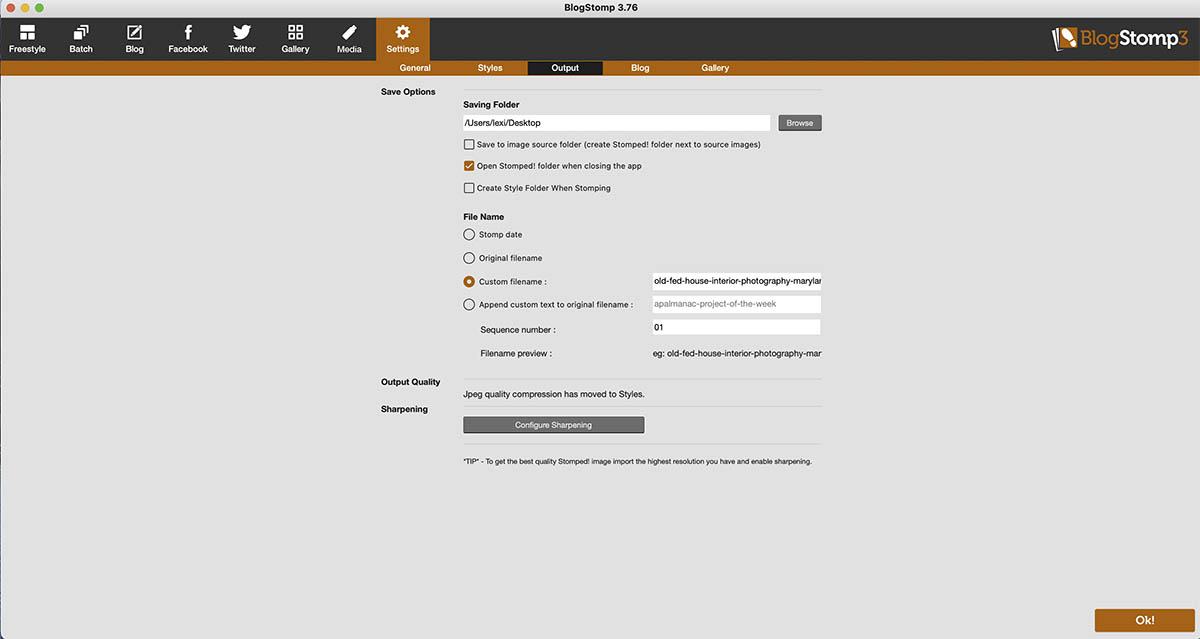
I rely on Adobe Lightroom a lot, and they make it easy to export a batch of photos to specific size parameters. When exporting from Lightroom, no matter what your original file size is, you have control over what it is exported as. In my workflow, if I am exporting a batch of JPEGS to use on the web, in the Export menu, under File Settings I choose to Limit File Size To: and will input 500K or whatever I size am trying to stick within. In the next set of settings, under Image Sizing I almost always select Resize to Fit: Long Edge and tick Don’t Enlarge. Remember, we want to be smaller here. From there I’ll select the maximum pixel amount I want for the longest side of my photograph depending on what I’m using it for. For photos being uploaded to the web, I always export at 72ppi
Here’s an example. I’m exporting a 4017 x 6029 pixel file for the web. I am limiting the file size to 500K, and setting the size parameters to 1600px on the long edge, at 72dpi.
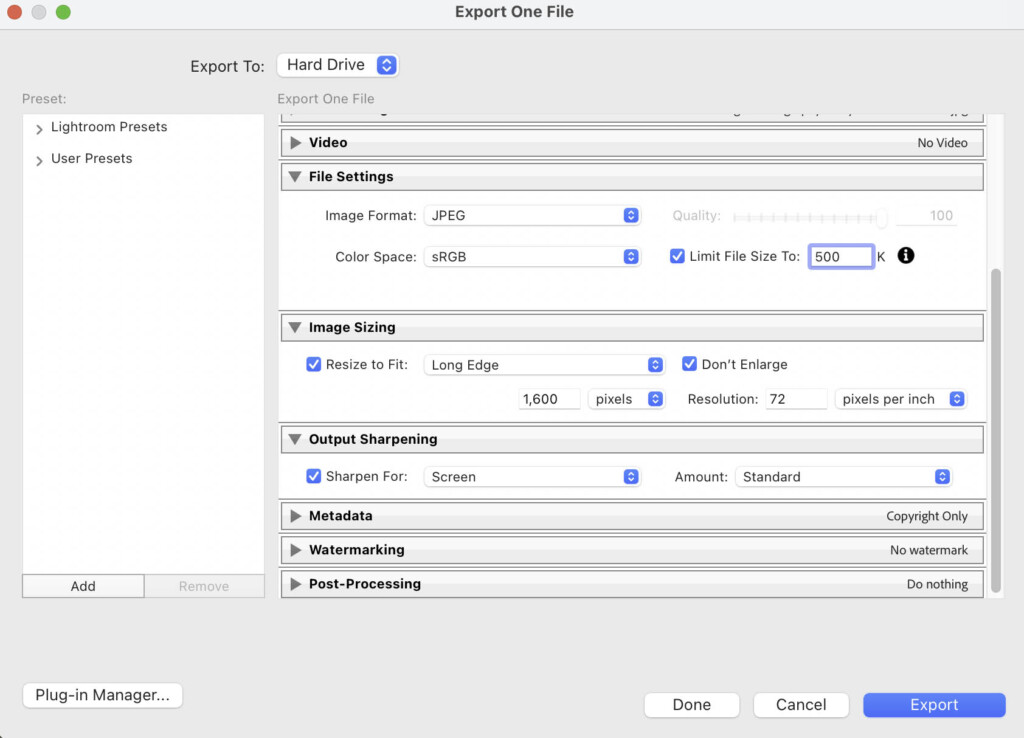
The resulting file size is 463KB which is a fairly light file size. Not to mention it looks great on my 27″ 4k monitor.
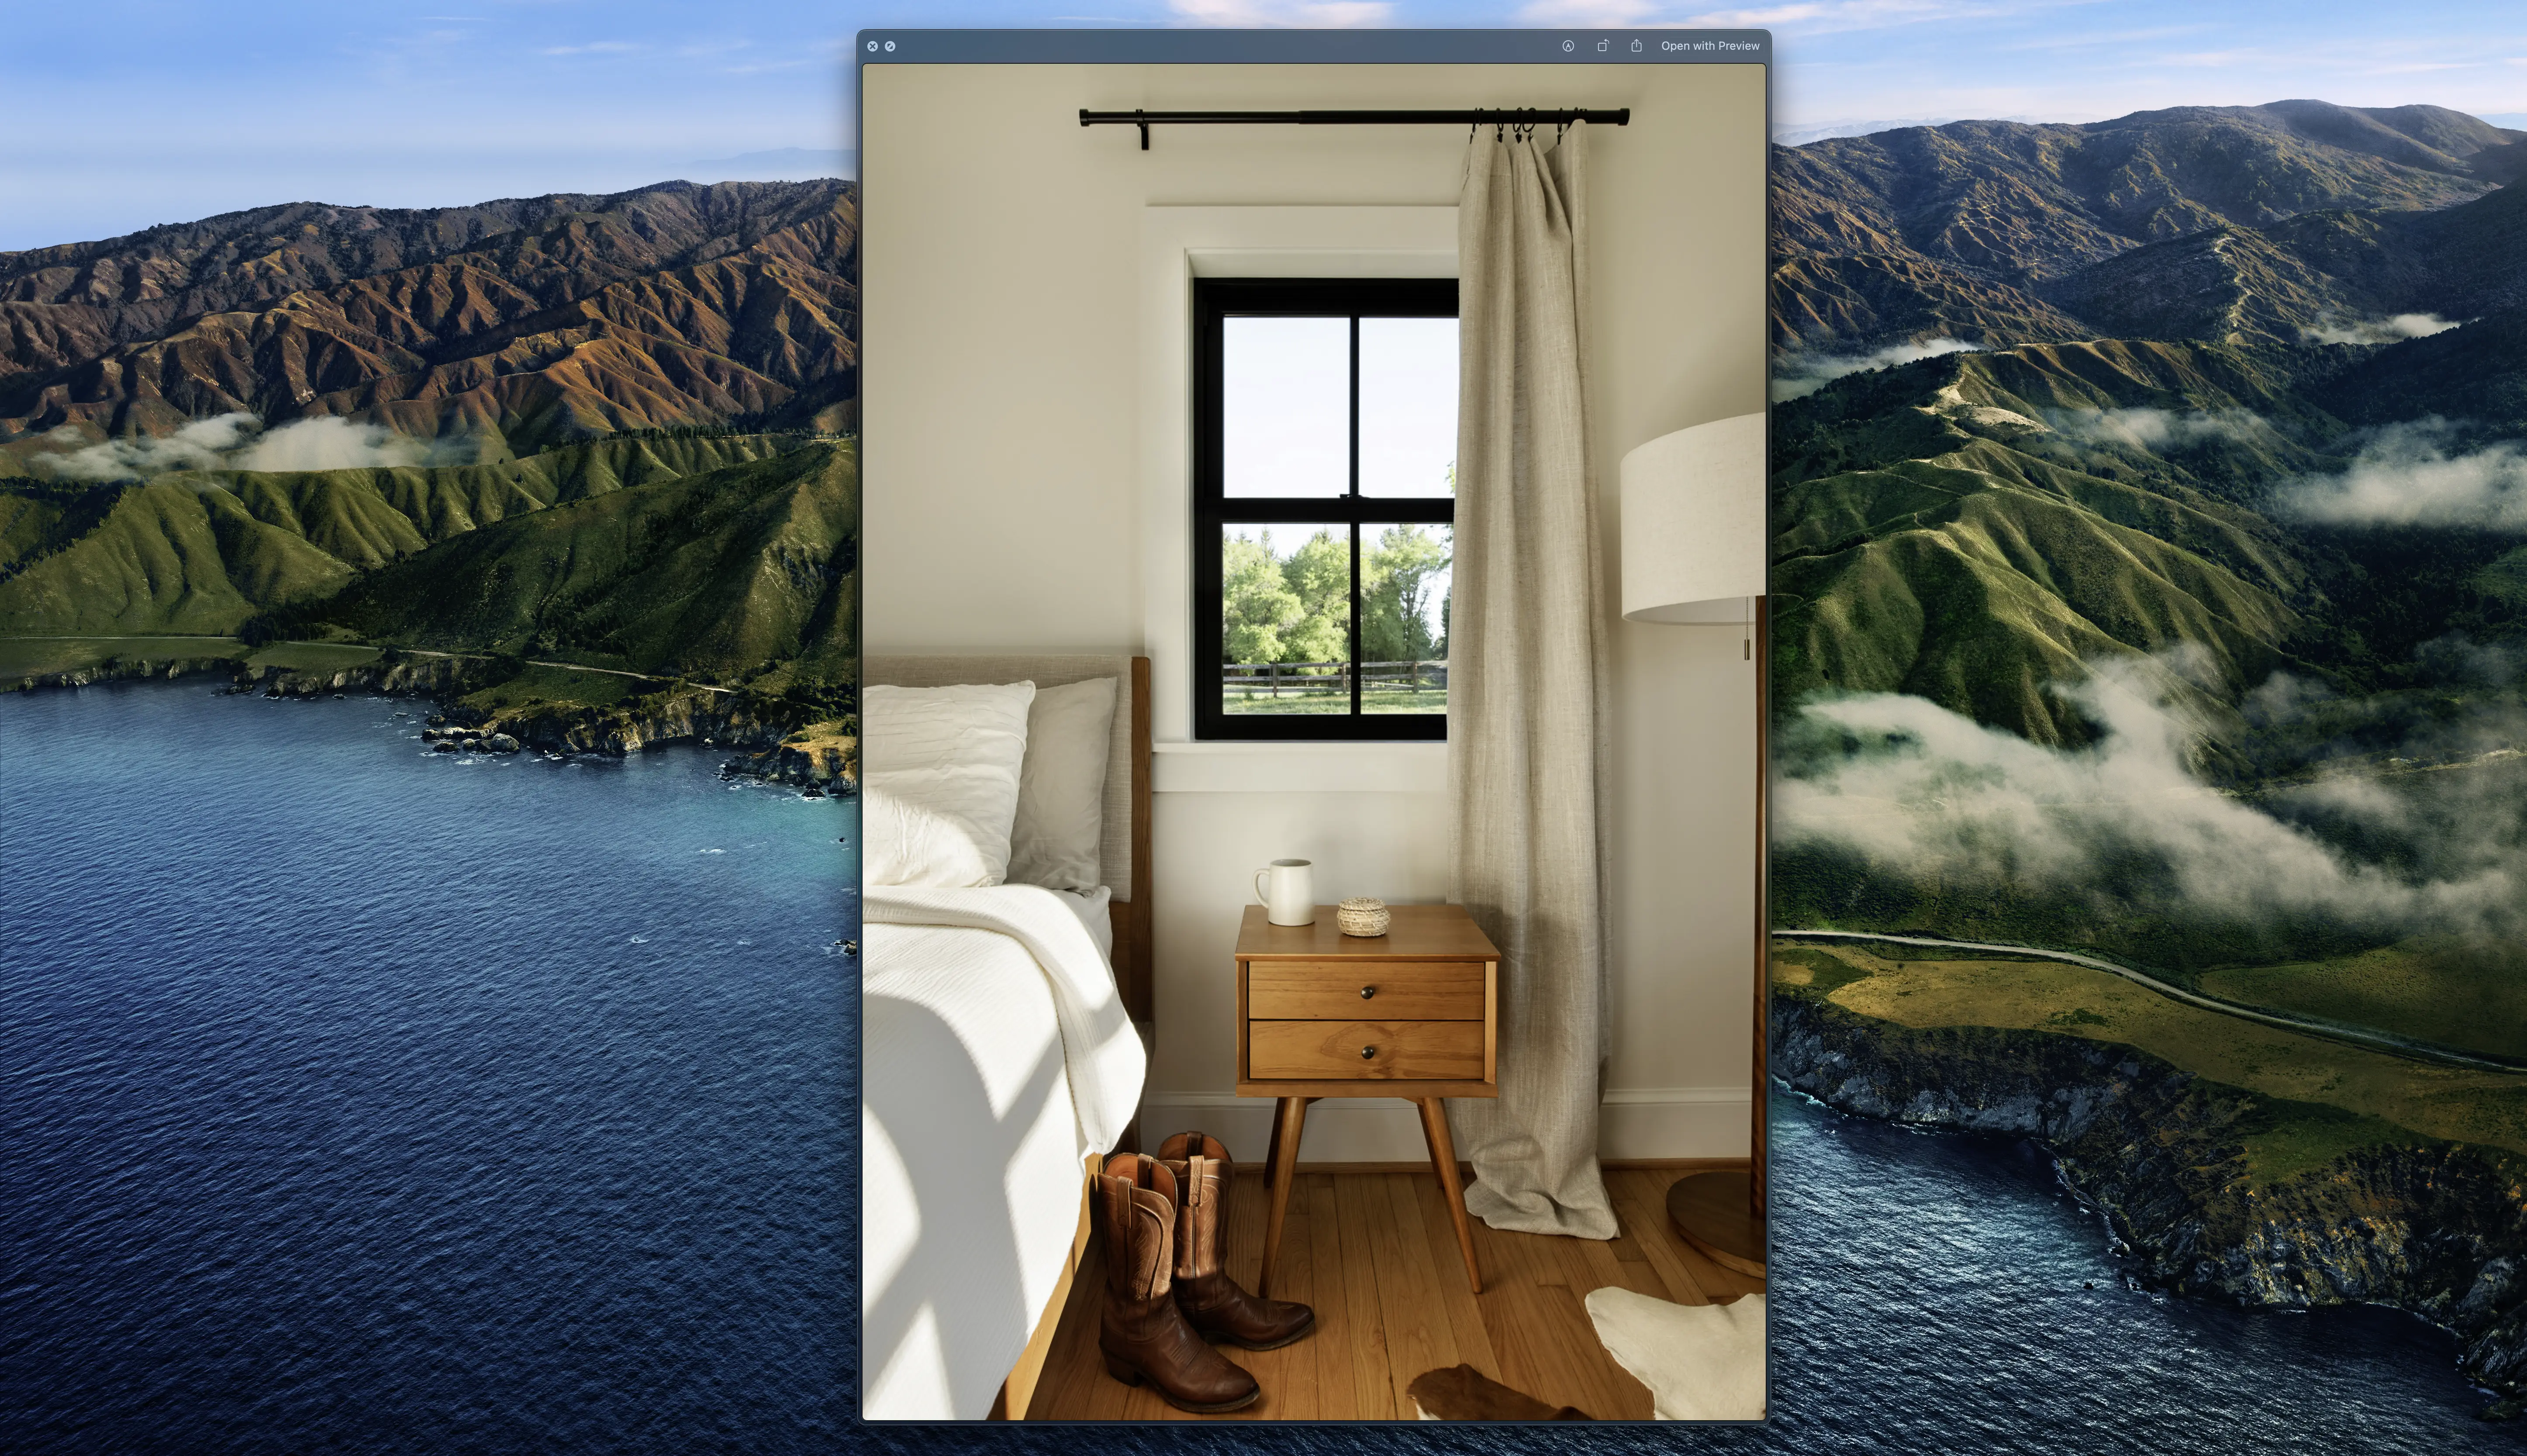
Now that’s with Lightroom. You can use Capture One’s exporter in a similar vein. With trusty Photoshop, you can also set your image size specs and resolution. I prefer the “save for web” function because you can see the file size of what you’re about to export. You can do literally everything with Photoshop and Lightroom or C1 which you probably already have. I’m lazy though and do love working quickly with batches of photographs, especially if it is for a blog post or for sharing a bunch of photographs from a project.
When I’m uploading batches of photos to a site, like here at APALMANAC, I use a desktop app called Blogstomp. You can set the parameters of your file sizes and file names and then run them through the processor so that each photograph is resized and renamed to your specifics. I’d honestly recommend it if you’re thinking about blogging or posting regular project updates on your website. You can learn more about Blogstomp here. I’m not an affiliate, I just use it every day!
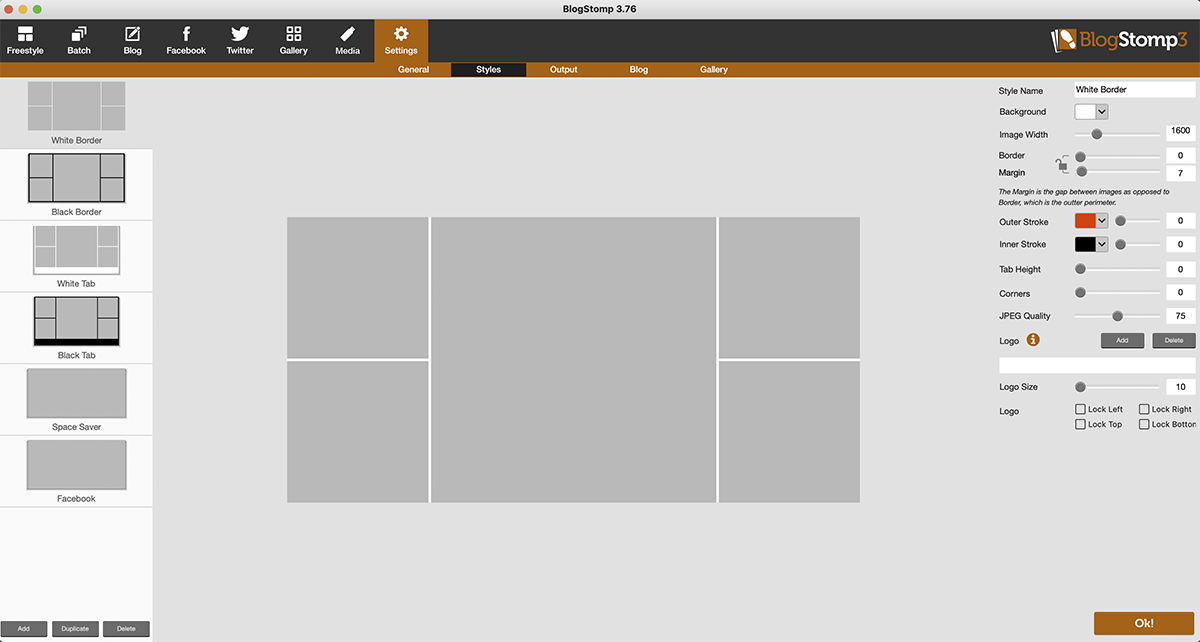
So in this instance, I ran the same original file through Blogstomp and had it exported at 1600px on the long edge. The resulting file size was 466KB. You can quickly roll through a batch of photographs you’ve already exported this way for your site. Not too shabby!
Another helpful tool is the desktop app SpaceSaver. It is handy for optimizing image sizes and making them as small as possible without compromising quality.
You can run your large files through SpaceSaver, and watch it reduce the file size with pretty much no visible difference in photo quality. SpaceSaver is $49 and reduces file sizes better than most WordPress plugins that claim they do the same — plus the added benefit of no additional bloat on your website! I tested out how well it works by running that 463KB file I exported earlier through SpaceSaver, resulting in a lean 237KB file. Pretty cool!

In addition to the almost endless different ways to export your photographs to set file sizes, there are also an almost endless amount of web plugins that do the same. For WordPress, some of the popular ones are JpegMini, Smush, and TinyImage to name a few.
File naming
For the love of all that is good, don’t upload photos to your website like DSC_8675.JPG. We’ve already established that your photos are the piece de resistance of your architectural photography website. Put those babies to work! Your images should have descriptive names that apply to the photograph.
I like to roll with some variation of Structure Name + Location + Client Name + My Name. You can always do a little research and right-click on your fellow photographers’ photos to see what their file naming convention is.
Careful not to overdo it though. All things in moderation, and remember, trying to stuff in too many keywords can get you dinged.
Alt tags
One of the most important image tags is the alt tag. An alt tag or alt text assigns a description to your photograph that allows for better searchability as well as better accessibility for people who may not be able to see that image. The alt tag is also what populates when an image can’t be loaded. SEO tool Yoast explains it best by saying “The alt tag is used by screen readers, which are browsers used by people with a visual impairment for example. These screen readers tell them what is on the image by reading the alt tag. It’s not just screen readers that read alt text, though. Search engines like Google also use this information to understand the context of an image; to find out what an image shows, and what its purpose is.”
We want the internet to be accessible to all, and so does Google. They place importance on site accessibility and in particular, helpful descriptive alt text. In their SEO best practices guide, Google emphasizes that the more context is placed around an image, the more useful and discoverable it will be.
Google shares “When writing alt text, focus on creating useful, information-rich content that uses keywords appropriately and is in context of the content of the page. Avoid filling alt attributes with keywords (also known as keyword stuffing) as it results in a negative user experience and may cause your site to be seen as spam.”
So what does this look like for your architectural photos? The best thing to remember is to write your alt attribute like you were describing the photograph to someone who can’t see it.
Bad (missing alt text):
<img src=”fancy-contemporary-house-seattle.jpg”/>
Bad (keyword stuffing):
<img src=”fancy-contemporary-house-seattle.jpg” alt=”modern architecture contemporary house Seattle contemporary home architecture photography of modern home best architecture photographer Seattle contemporary house photographer”/>
Better (but vague):
<img src=”fancy-contemporary-house-seattle.jpg” alt= “contemporary house”/>
Best:
<img src=”fancy-contemporary-house-seattle.jpg” alt=”sprawling cedar-clad contemporary home overlooking Seattle waterfront”/>
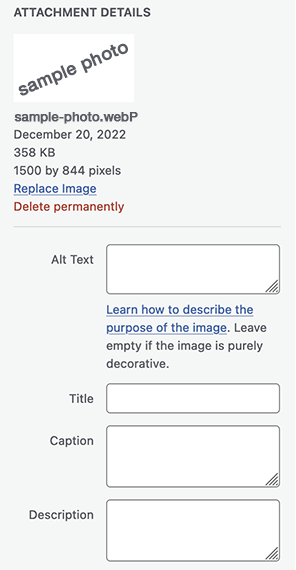
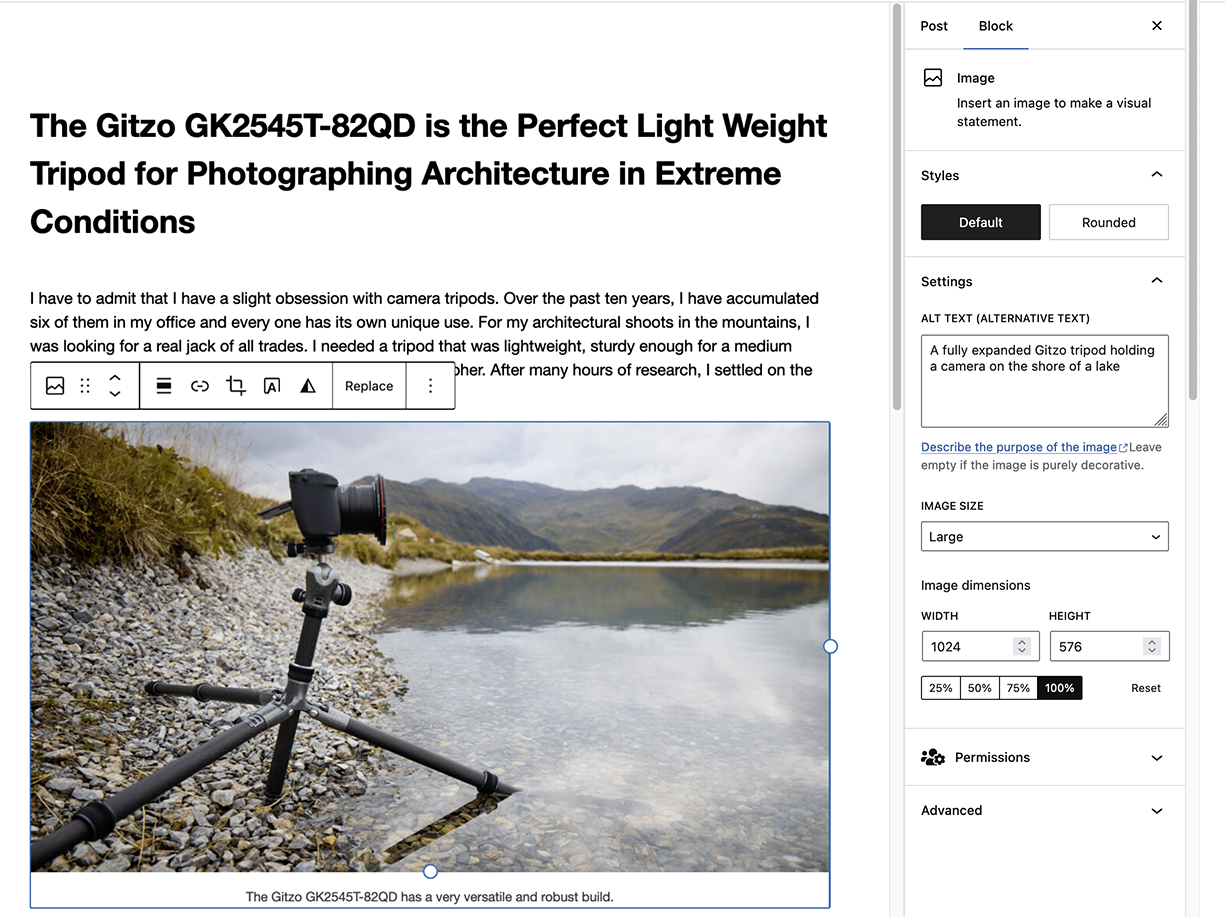
If the thought of web code is making your brain implode, don’t worry. If you’re using WordPress, there is a helpful little box to input this information for every photo you upload. You can find it in the media library:
You can also add it to the block editor sidebar like shown in this APA blog post:
If you’re using Squarespace, you can add alt text in the “File Name” field of the image block editor. For gallery images, your alt text is what you input into the description. You can watch this video if you use Squarespace and want to know more about it.
Metadata
Metadata is a mixed bag because it can make your files larger. However, we’re all about copyright here, so make sure your images are attributed to you. Do be sure your photo metadata has your name and website/contact info and copyright info. Filling out the description, tags, and location in your EXIF data may add some extra umph for SEO, because it is yet again helping Google understand your images. You can scrub some of your EXIF data like your camera model and settings, because they are pretty useless in this application. You can do this in Lightroom, C1, and Photoshop.
Keep your website up to date
Regularly updating your website is a healthy practice and is something that the ‘ole web bots are looking for. Keeping your site up to date and regularly making changes or publishing new content tells Google that your website is active, current, and always being improved. If you typically just update your site once a year with a swath of new photographs you’ve made… or less… I recommend being a little more regular. Now, you don’t need to do a Gossip Girl level of posting and write a juicy new blog post every day, but here are some actual practical ways to add fresh updates to your website regularly.
Upload your recent work
The most obvious way to update your website regularly is to get into the good habit of uploading your recent work. This doesn’t just benefit your search engine rankings though. It is also a great way for your clients – both potential and current – to see that you’re out there actively working, and are open to commissions. A bonus benefit is that by keeping up with adding recent work to your website, you bypass the dreaded end-of-year massive website update/redesign that so many of us procrastinate on and then begrudgingly do.
Update your accolades
Hey you little award winner, you! Keeping your accolades and client list current is low-hanging update fruit! So if you’re the kind of person who likes having a list of clients, publications, and awards on your site (usually in the About section), make sure you are updating these each time you add a new notch to your belt.
Blog
Blogging is not low hanging fruit and it requires the most effort of all the updates. But, the hard work pays off because this is probably one of the best things you can do for your website.
As mentioned before, it’s a solid way to keep your website current and relays to Google that there are signs of life on your page. Each of your posts becomes another searchable little breadcrumb for clients, leading back to your website.
It is also a wonderful opportunity you can seize to share a bit of your personality with potential clients, and let them get to know your working style. Would you rather hire a service where you feel like you know a bit about the person doing the work, or be in the dark about what they’re like and how they operate?
An important thing to remember when you’re writing blog articles on your architectural photography website is to primarily write for your clients, not other photographers. The builder who is about to pay you to photograph their project probably doesn’t care about that you switched from a Canon 5D Mark IV to the R5. What they do care about is why they need their project photographed. Think about what kind of posts you can write that have actual value to the people tentatively hiring you.
Here’s an example of Albrecht’s blog. I appreciate how he has written posts dealing with things that his potential clients may search for on the web. He is using it as an informative service and by showing his knowledge on the subject – such as “Which photo style suits your hotel pictures?” – Albrecht poises himself as a great candidate for future hospitality photography gigs.
Photographer Seth Parker has a simple post on his architectural photography blog that goes over what a catalog shoot looks like behind the scenes. It’s a quick paragraph with a timelapse shot on a phone added in. Easy. Powerful.
Another favorite blog example is by architectural photographer Marnie Hawson. Marnie’s beautiful Journal talks about all sorts of things that may interest her niche of clients – from her powerful post Why I only work with a stylist to 10 steps to becoming carbon neutral certified. Marnie is a certified B corp who works with folks creating sustainable architecture, so it just makes sense that she would write an article benefiting and seeking out clients who place importance on carbon neutrality.
Use your brain. There are all sorts of powerful, relevant things you can share that keep your website fresh and scatter the marketing seeds of your personable small business.
Can you implement project descriptions?
If you’re going to take the time to upload a smattering of photos from your latest and greatest project, consider taking a few more minutes to mention the details of the day. Who did you photograph the job for? Where was the piece of architecture located? Talk about any relevant details from the day. You can speak about how clever you were in solving site-specific challenges. Or how your 15 years of experience came in clutch on a demanding, time sensitive shoot. How did you handle the reflections on the massive amount of glazing? Did you have to slide a security guard $20 to sneak rooftop access to an adjacent building because you were in a no-drone-zone?
These are all things your client actually cares about, and topics that they may search when wondering about the details of getting their latest creation photographed.
Jordan Powers, who I referenced earlier in the article, is an architectural photographer working in Nashville and Asheville. Love saying those two together! Jordan voiced a staggering statistic – he estimates that in 2022, SEO brought him about 90% of his business. Wow! Clearly, he is doing something right. One approach in particular that I think he totally nails is his project descriptions:
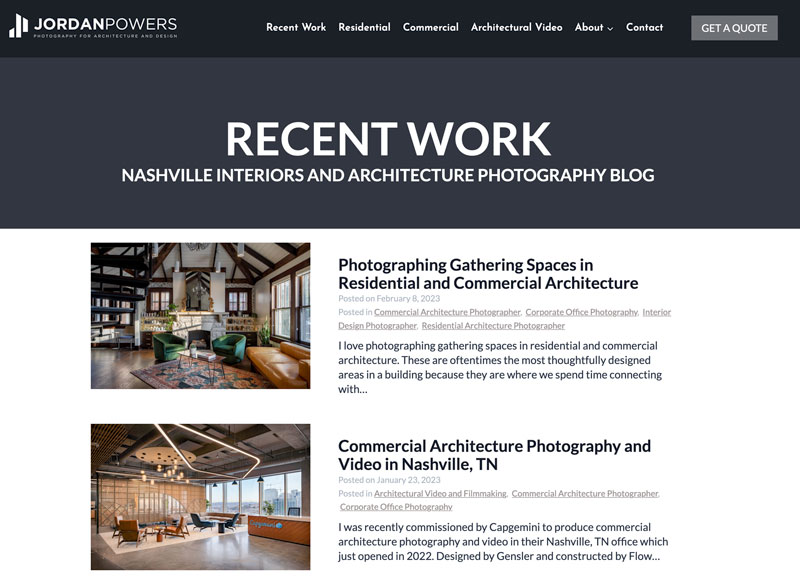
This is a practice I love to see, and it just makes sense. Give it a try and you may be pleasantly surprised.
Long tail keywords
If you’re going to write, write smart.
A big fat chunk of SEO is all about keywords. Keyword research, keyword density, keyword stuffing, keyword rankings.
Keywords.
What the heck are they? Basically, a keyword is a term that you want to show up for on a search engine. Architectural Photography is an example of a keyword. So is Architectural Photography Dallas. When your client types in architectural photography in her Google search bar, a LOT of results come up. It is a very competitive keyword. It’s big and all-encompassing. When she types in architectural photography Dallas, a smaller, more fine-tuned result crops up. It should be localized just to websites that mention the phrase architectural photography Dallas, or some similar variation of that phrase.
Longtail keywords are very specific keywords or phrases. The more specific, the less search volume there is for these phrases. But, this gives you a chance to rank really, really, well.
It’s pretty rare that you will rank on the first page of Google for architectural photographer. But, the chances of you coming up at the top for a very specific search like (again to reference Marnie) sustainable architectural photographer Melbourne Australia, is much greater. By the way, Marnie does rank well for that.
You’re already in a niche of an industry. You don’t want clients who are searching for just any old photographer. You want a client searching for an architectural photographer, an interiors photographer, a hospitality photographer. Can you niche down even further when you write?
Circling back to the plumbing utility company website comparisons, let me relate a longtail keyword story to you. In Maryland where we are based, it’s pretty hard to rank #1 for plumber. Niche down. What about the bread and butter of the family business, sewer repair? That’s shockingly competitive too. We added a services page about a weird peripheral service my husband’s company offers – sinkhole remediation. Sinkhole remediation and all of the adjacent varying terms (sinkhole repair, fix sinkhole in yard) in our area are not competitive high-volume keywords. Our little service page rocketed to the top of the search results not just locally, but nationally.
Why does this matter? Sam is not going to drive to Michigan to fix a sinkhole. Welp, ranking very well for a little more obscure (but relevant) keyword has power. Longtail keywords are a rising tide lifting all the ships of your website’s searchability. As we climbed the rungs of Google listings for sinkhole remediation throughout the USA, in the search engine’s eyes, we were becoming a more credible, more authoritative website. This ultimately does good for the entirety of your website – including the more competitive things that you do actually want to rank well for – like Baltimore sewer repair or San Francisco Interior Photography.
So, when you sit down to write a blog post, project description, or biography, consider if there is very specific verbiage to mention that your client may be searching for.
Headings
You are currently in the midst of a very organized series of headings. We’ve got H2 headings, H3, headings, and H4 headings here. It keeps information organized by establishing a hierarchy of text and ideas. You’re going to want to make sure each page of your website has an H1 heading, which is your site’s title. This is the big boss heading and lets everyone – including the search engines – know what your page is about. From there divvy up your info under H2 headings for main ideas, H3 headings for supporting ideas, and so on. You can use headings to organize your information when creating detailed project posts and if you choose to blog. Staying organized is just a good overall practice to put in place when it comes to your website.
Site Health and Plug-Ins
Let’s talk about site health. Here are some things you can implement as well as some things to keep in mind!
SSL Certificate
An SSL Certificate is the reason you see that little lock next to https://apalmanac.com/ in your browser bar above. An SSL Certificate certifies that a website is authentic and has an encrypted connection. This protects the user’s data. Google (and I) want you to have a safe browsing experience and not have any of your data stolen as you hop around the web. Websites with up-to-date SSL certificates are trusted, and in return, these sites are given preference over those that are not encrypted. Most hosting platforms, like GoDaddy and BlueHost offer the addition of SSL certificates.
Plug-Ins
Don’t overdo it on the plug-ins
At my first rodeo – aka WordPress site – I was taken back by the amount of plug-ins that were available. There are probably as many WordPress plug-ins as there are stars in the sky, all offering you some kind of improved website function. Careful out there, because if you install too many plug-ins, stuff starts to get weird. Then you’ve got plug-ins counteracting plug-ins and just a huge bloated mess of a website.
Yoastess with the Mostess
One plug-in that I am a fan of is called Yoast. It’s an SEO plugin for WordPress that I use on the C.A. Taciak & Sons website and I know fellow APA writer Albrecht Voss used on his site. I have the free version and find that it does a great job of easily allowing me to quickly write title tags and meta descriptions. Oh God, more jargon!
Title Tags and Meta Descriptions
Your title tag is the title of your page. It’s the blue clickable link that shows up when someone Googles a query. The meta description is the text below that. This is important! It is often a stranger’s first impression of your website. When your future client searches “architecture photographer near me,” and you pop up, hopefully, your title tag and meta description will lure them on in. Think of it like speed dating. Your client is faced with pages and pages of options – dates – and you have a few seconds to catch their attention while also satisfying what they’re looking for.
Be specific. Be concise.
Backlinks
Next up on our docket is talking about backlinks. Don’t you just love all of this terminology?
Also called an inbound link, a backlink is literally what it says – a link on one website that directs back to your website.
Backlinks are powerful in SEO because they show the search engine gods that your site has information good enough to be referenced by other websites. It has previously been confirmed by Google that inbound links to your site are one of the most important search engine ranking factors, up there with the quality of your content itself. How does this apply to you as an architectural photographer?
In my humble opinion, it is imperative that when other folks link to your work or attribute a photograph to you, your website is being linked to. You need to ask for a clickable link that directs to your website any time your work is mentioned on the web.
In our article, You Should Be Charging Licensing Fees for Publication Use of Your Images, I spoke a bit about how image attributions and photo credits. If you are for some reason accepting a photo credit in lieu of payment for the use of your images, you absolutely should be insisting that that byline is a backlink to your website. Then you will at least get something for your work (although I am still adamant that you should be charging for the use of your images in publications).
Even if you have been properly paid for your work, I would still make an effort to ask that when mentioned in an article, on your clients’ sites, in awards, etc., that your website is linked to.
Make Sure Your Site is Mobile Friendly
We touched on it a bit before, but it is important so I’ll say it again: it seems like almost every human alive has a smartphone (including that baby in the booth next to you) and they use it countless times a day to get on the internet. Google actually looks at mobile sites first.
Your website needs to be mobile-friendly. That means it needs to be speedy and easy to navigate. You can implement the following things to help make your site mobile friendly:
- Make sure your images are the right file size and load quickly
- Lazy load images (learn more here)
- Be sure your text is big enough
- Make sure buttons and other clickable elements on your page aren’t too close together
Set Up a Google Business Profile
My last recommendation to delve into is setting up a Google Business Profile. I’m not going to walk you through the steps on how to do it (you can learn that here) but rather why to do it.
Google Business profiles pop up in their own area, usually above organic and paid listings, or to the side of them. Google Business profiles work in conjunction with their Maps feature. I’ll bet you used them before when looking for a restaurant or doctor. The business listing shows where you are based, your reviews, how long you’ve been in business, the services you provide, a link to your website, and often a button to call you.
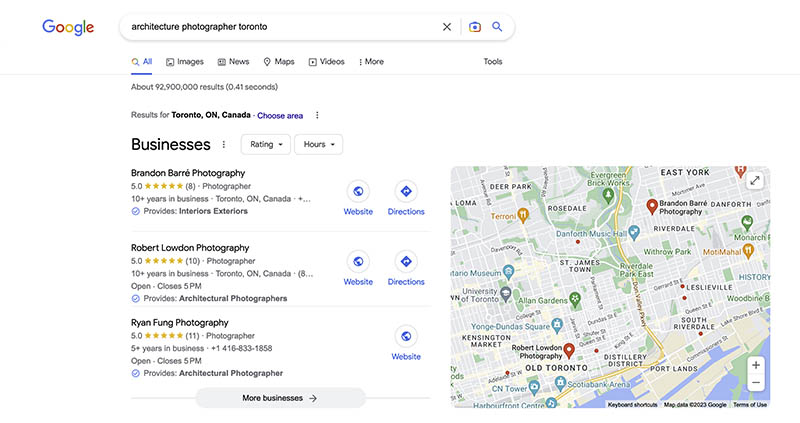
I typed in architecture photographer Toronto and Brandon Barré obviously populated first on Google Businesses with a stellar rating, as well as a few other photographers. This makes it so easy for potential clients to find you and quickly access your information.
Through your Google Business profile, you can also upload images, and link to posts on your website. If you have a Google Business profile, you are more likely to show up in “near me” searches, which are so important. I can’t recommend enough that you take the time to set one of these profiles up. Especially if you’ve read this far into this enormous post.
My big takeaways – a summary of this massive article
These are the actionable items you may want to implement in your website:
- Make sure your website is user-friendly, fast loading, and organized both on desktop and mobile
- Get in the good habit of regularly uploading your recent photographs and projects
- Export your photos for your site as small, fast-loading file sizes
- Use descriptive names for the photographs you are uploading to your site
- Consider saving your website photos as webP or AVIF files. If not, a Jpeg is fine (for now)
- Assign the photos on your site an alt tag description
- Consider writing project descriptions or blog posts that are relevant to your work and your clients
- Be sure that your site is being linked to in photo credits, and any other instances that your name or images are being used around the web
- Set up a Google Business profile
Here is a recap of some of my favorite tools:
- Use the free Google tool PageSpeed Insights to check your site health and load time
- Also free, Google Analytics shows you cool data details like how many visitors there are to your website, how long they stick around, which pages are viewed the most, what type of device they’re using, and how they found your website
- Blogstomp quickly preps batches of your files for your website, confining them to whatever size and naming parameters that you set
- SpaceSaver is a desktop app that cuts your file sizes down while preserving the detail and quality of your photographs
- Yoast is a WordPress plugin that helps you easily wrangle the finer points of your SEO, like metatags. Their site is chock full of SEO knowledge and advice. I would recommend referencing it
My ultimate advice for anyone who has made it this far down the page and obviously cares one iota about their website is this. Do not get hung up on the minutiae of search engine optimization. It is easy to be overwhelmed by all the jargon and “must-do” information out there, often written by SEO software companies or digital marketing agencies on their blogs in an effort to overwhelm you to hire them. You can maximize your website’s searchability and usher more potential clients toward your photographs yourself. It just takes a little organization and a little time.
What is good for your SEO score is good for your website health, and also for you and your clients – or anyone who comes across your webpage. That being said, I want you to approach SEO like you are creating the website you wish was out there when you hired someone. Write helpful, informative posts and project descriptions for humans, not page-crawling robots. Name and tag your photos in ways that make sense, and make the internet a more accessible place for all.
The internet is full of crap. Make sure your website is an organized, easy-to-use tool to show off your work and tell a bit about yourself and your services. If you are going to write, whether that be a blog or a recap of a project, don’t be vague. Be intentional about everything you do on your site. You are putting in the hard work so it can go to work for you. There are no shortcuts or hacks or fast tracks here, so if someone is reaching out to you telling you they can zip you to the top in exchange for money, beware.
I’ll end this article with a poignant piece of advice Jordan Powers said while we were chatting about SEO recently: “People preach SEO as a magic bullet. SEO only puts you in a good position to be contacted, but it doesn’t guarantee you will be contacted. This is where a solid website presentation, good branding/message, and a good portfolio all come into play.”
Make beautiful photographs. Be a joy to work with. Practice good business habits – including having a healthy website.